
Certain scenes in nature just aren’t well represented with the traditional aspect ratios of most cameras. Much of my work has been in the Tetons, which as an abrupt, linear mountain range with no significant foothills on one side, is best captured as panoramas. There are many wonderful images of the Grand Teton or Mount Moran, but if one wishes to capture the spectacular nature with the wider perspective seen in person, then it’s time to build a panorama.
First a couple do’s and don’ts. Do use a tripod, and before shooting, get it as close to absolute level as possible. I have shot and sold hand-held panoramas. But it’s best to use a tripod, at least until you’ve done lots and lots of them. And it’s not enough to just level the camera. Use the bubble level on the tripod and adjust the legs to get that bubble right in the middle. As for don’ts, using a polarizer may accentuate the look of clouds, but it can definitely ruin a panorama. The polarization effect is most intense at a right angle to the direction from the sun. So if the sun is almost exactly behind you, slightly to one side, then applying a gradient filter during the post-processing can correct an extremely uneven sky. If, as is usually the case, the sun is significantly more to one side than the other, there will be a dark section somewhere in the sky that is difficult to clean up.
Now for a brief digression to consider the pairing of your lens and camera body. If using a full frame (FX) lens on a APS-C camera (DX), then only the ‘sweet spot’ of the lens is being used. There is much less potential for light fall-off and distortions in the corners that might cause a problem when stitching images. If using an FX lens on an FX camera, or a DX lens on a DX camera, you may wish to plan a little more overlap of the images to avoid problems. Alternatively on many FX cameras, you may wish to use one of the other crop modes, such as the 1.2 crop mode Nikon offers with some of its models. For practically any lens, the center area produces the best optical results, with diminishing quality toward the corners (some lenses more so than others). For this reason, I sometimes do use the 1.2 crop mode.
So, you have a level tripod and a camera without a polarizer, what’s next? I prefer to use the camera in landscape orientation to shoot the sequence. Many others prefer to do it in portrait orientation. I primarily use a 36 MP Nikon D800E. So I have enough pixels to print at least 30″ in the short dimension with the camera in landscape orientation and not in a crop mode as discussed above. If I were shooting a 12-16 MP camera and planned to print big, I might go portrait for the extra pixels. The reason I prefer landscape orientation is simply just that I find it marginally easier to insure I have everything level in that orientation.
If possible, use a remote shutter release with your camera in the mirror-up mode. It was hard getting that tripod perfectly level, so make the most of the situation by getting the sharpest image possible with the greatest dynamic range for your camera. To do that, you need to use the base ISO for your camera with the mirror-up.
Next, let’s consider some settings. First of all, definitely shoot raw. Getting things right may involve adjusting some things when producing the individual images, so having the flexibility of raw files is important. Second, have a plan for white balance. I set a white balance appropriate for a given scene, knowing that I can change it when converting the raw files. There are occasions when the color temperature of the light may change from one part of a panorama to the other. In such cases I will settle on an average white balance to use when producing the individual files.
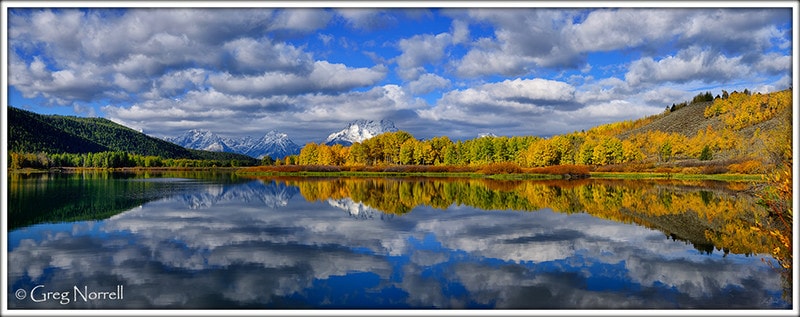
In this example, there was quite a variation in the color temperature from one side to the other, so I chose a WB more toward the shaded side, allowing the brighter sunny side a warmer tone.
So it’s almost time to shoot. The camera is ready on the tripod, and I put it in aperture priority mode and move the camera from one side of the panoramic view I wish to capture to the other, watching the shutter speed indicator in the viewfinder. I need to decide what aperture and shutter speed I will use for the whole scene. If everything in my scene is distant, I’ll go with f/8 most of the time. That aperture usually gets the best results on most lens. If there are elements to the scene closer in the foreground that I want sharp, I’ll stop down accordingly. In general, I never go to apertures smaller than f/11, because diffraction will degrade sharpness at those small apertures. If the scene can’t be captured with foreground to background adequately sharp, then it’s time to consider stacking images.
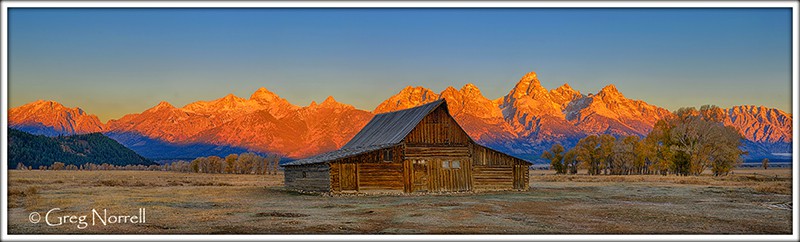
There are ‘Tilt/Shift’ specialty lens that allow the plane of the camera sensor to be tilted such that practically any scene can be in focus near to far at any aperture. If you don’t have one of those lens, then the next best thing is to take multiple shots of each component of the scene with the only change being the focal point. So, for example, I might have a scene where there’s a frame on both edges of the panorama where I need to stack two (perhaps more) images. For each edge, I will take the distant focus shot and overlay that with the near focus shot in another layer. Then I carefully erase the out of focus distant part to reveal the sharp shot underneath.
This is an example of a focus stacked scene, where each side had two shots with different focal points blended together.
Once I’ve decided what aperture to use, and whether or not I may need to stack some images, it’s time to pick the shutter speed. Usually the shutter speed the camera suggests to accompany a specific aperture will vary a little from one side of the panorama to the other. I will usually choose the fastest shutter speed across the panorama. It’s much easier to extract details in shadows than to recover blown highlights. But to be safe, I may shoot the sequence a couple of times with different settings in case one set turns out better than another.
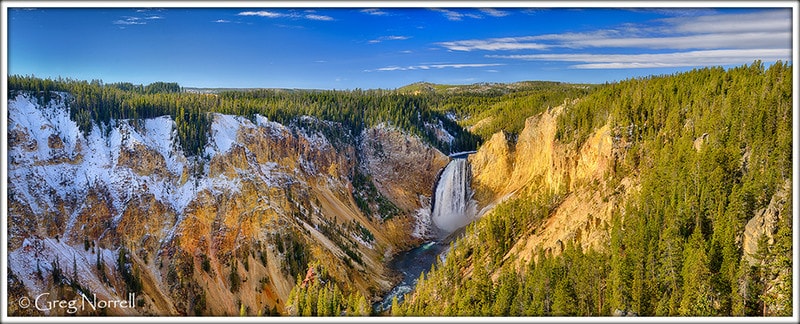
Now that I have chosen the aperture, shutter speed, and focal points, I click a shot. But this is just a test. Time to look at the histogram. I usually know before I do this if the dynamic range of my scene will exceed my camera’s ability, but this is the check. If I’m shooting the alpenglow first light of the morning hitting the top of a mountain range with a sunless valley below, the camera is not going to see what my eyes can. Cameras get better and better, but they probably will never come close to the dynamic range of the human eye. If my histogram shows a range from total dark to blown highlights, I will have to bracket the exposures (HDR) to make the effort work.
This is an example with a bracketed sequence. Without multiple exposures, the top would be blown out and the valley floor would be too dark. Using a gradient neutral density filter can tame some such scenes, but if the zone over which the light changes varies too much, additional problems may result from using the filter.
Time to shoot the panorama, finally. I’ve picked my settings, I know whether I’m going to have to focus stack some spots, and I know if I’m going to have to bracket the exposures. Time to put that camera in manual mode and go. Start at one side of the panorama and use the remote shutter release to capture the first image. If I may need a shot with a different focal point, I carefully move the focal point without moving the camera and get the next spot. If I’m going to have to use bracketed images, I usually take three shots, each one f/stop apart. Some scenes will occasionally have so much light variation that I have to bracket four or five shots at each portion. Whatever I think I might need later at home when I set out to build the panorama, I get it now. It doesn’t take nearly as long to shoot a few extra images than it does to go back and redo the effort. Often times I take shots thinking I might have to focus stack or do an HDR, and I end up just fine with a simple set of images. But not always.
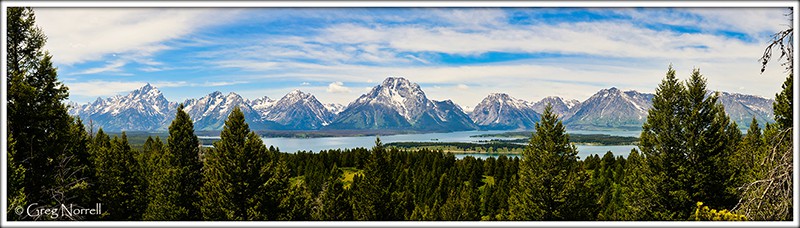
In this final example, I had a scene not requiring a bracketed sequence and no need for multiple focus points. For such cases, the shooting is pretty simple.
How much overlap of the component scenes is something you’ll get a feel for with experience. And as said much earlier, the lens-camera combination and perhaps a chosen crop mode should be considered. I usually just overlap a slice that I can definitely visually identify in the viewfinder. So I work from one side of the panorama to the other getting whatever shots I might need, always ensuring that I have identical settings for each piece. Think of your future panorama as a gourmet meal. This is your shopping trip to get quality ingredients. Later you get to carefully blend the ingredients to produce your delicacy. That part of the process is better addressed separately. For now, I’ll just say that I use the Photoshop Photomerge command with “reposition only” selected, and stitching is usually flawless. If my tripod was not perfectly level, I may have to uncheck ‘reposition only’ when merging to salvage the panorama.
Well I hope that this has been instructive. Note that I didn’t discuss anything about composition here. I just focused on the technical aspects for now. Perhaps you’ll find it useful for the next time you shop for the ingredients of your future panoramic delicacy.